

If you have been in Hungary for sure you have seen this very good sweet 🙂
It’s everywhere, it’s definitely one of the most common pastries here, and if it’s well done it’s really good, and it has nothing to envy to a croissant 🙂 actually there are 2 types of csiga: the one with a dough similar to “kalacs”, so softer (a very good example of this it’s available at Artizan Pekseg in Budapest, one of my favorite bakeries), and the one with the dough similar to a croissant.
Unfortunately to find really good Csiga it’s not always easy, in many places they are too dry and made with low quality fats, but luckily there are more and more modern bakeries doing very good ones (especially in Budapest).
I know, it’s a very long process and it’s not easy if you have never done this kind of dough, but there is no doubt that it is 100% worth all the efforts! The result will be amazing and you will realize that what is being sold in most of places has nothing to do with a real Csiga. You could do it for the weekend 🙂 From the first step to the last, you have to count about 18-20 hours.
This dough is very similar to the dough of the croissants, and also the process to make it. There is a little bit less butter, but then it’s really similar.
It’s important to use flours with a high strength, but not too much, around W300/W330, and to use a good quality butter (with plastic texture and that doesn’t melt easily).
Important are also the temperatures: if the butter is too cold there is the risk to break the dough and the layers while folding, if it’s too warm then is coming out everywhere. The ideal starting temperature of the butter is around 15 °C. And during the lamination process, the dough should ideally be at about 4 °C.
And important are all the resting times, not to stress the dough. And it’s important that the room temperature is not over 20-21 °C.
Let’s see how to make it now.
INGREDIENTS (10-12 pieces):
For the dough:
- 500 g flour (I used 50% Manitoba flour W360 and 50% “Farina buratto Tipo 2”, W290, less refined)
- 300 ml milk
- 300 g butter (50+250)
- 50 g sugar
- 20 g fresh baker’s yeast
- 12 g salt
For the filling:
- 200 g sugar
- 80 g cocoa powder
To brush:
- 1 yolk
- 20 ml milk
- First of all we have to do the dough, I suggest to do it in the evening. Sift the flour, add the sugar and the yeast diluted in 200 ml of milk, and start working at low speed. Add gradually the remaining milk and work the dough for 3-4 minutes. Before the dough if well formed, add the 50 grams of butter (it has to be very soft) in 2-3 steps, wait always that is absorbed. Then increase a little bit the speed. When the dough is smooth and elastic but not too strong, add the salt. All together work the dough for about 10-12 minutes. Then put it in a bowl, cover with a plastic wrap and place it in the fridge, on the bottom, at 4°C. Leave it until the morning, about 10 hours.
- In the morning take out the dough and flatten it at about 2 cm thickness, then cover it again and place it in the fridge for 1 hour.
- Meanwhile prepare the butter. Take two baking papers and place the cold butter in the middle. Wait 5 minutes to get a bit softer, then squeeze it with your hands first, and then with a rolling pin. You have to make a rectangular shape, about 5 mm thick.
- Now take out the dough from the fridge and flatten it, in a rectangular shape, about double size of the butter. Then place the butter in the middle and fold the two sides over the butter. Turn the dough 90° and make it longer in vertical, first by just pushing with the rolling pin, then by rolling over it. Then make the first 3-folding.
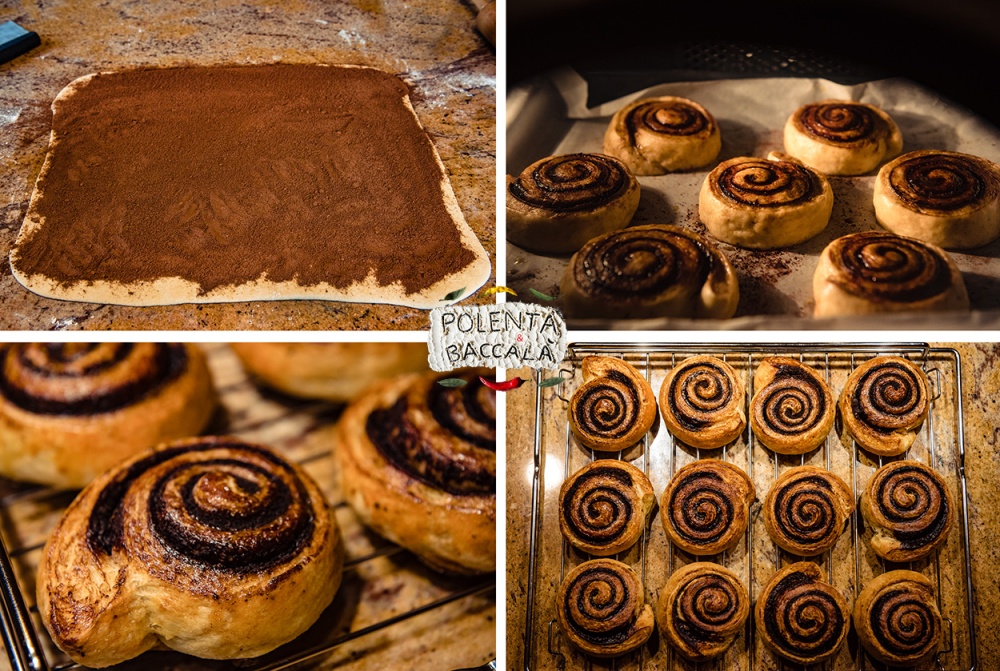
Do it 3 times (so three tri-folds), and between each time place the dough to rest 1 hour in the fridge, covered with a plastic wrap. It’s easier to watch than to explain, so watch THIS video for example. - Now we are ready to flatten the dough. Flatten it at about 3-4 mm thickness. Then mix the sugar with the cocoa. Spray some little water over the dough and then spread the sugar-cocoa mix all over the surface. Spray again some little water over the filling.
- Then roll carefully the dough, and spray again some little water on the last piece of dough, so the roll will not open.
- Now cut the roll into pieces (from which side is up to you, if you want large rolls or a bit smaller), large about 2 finger, and place them already inside the baking trays, over some baking paper. Leave enough space between them, push them down with your hand, to make it more compact, and let them rest for 2-3 hours (more in winter, less in summer), at room temperature, covered with a clean towel, and spray a little bit of water over the towel, to keep it moist.
- After this time, when the rolls have raised enough, push them again down with your hand, and then brush them with the mixture of milk and yolk.
- Now place them in the oven, static mode, at 210 °C but in the moment you close the oven set the temperature at 180 °C. Bake the first 5 minutes with the oven a little bit open (put a wooden spoon between the door, for example), then 10 minutes closed, and the last 5 minutes again a bit open. All together it will take 20-22 minutes to be ready.
- When they are ready place them over a grid, to cool down.
- They are ready to be eaten now 🙂
- The Csiga you don’t eat can be placed in the freezer: first place them in the freezer over a tray, separated, for 2-3 hours (after they have cooled down, obviously), then you can put them in the freezer in a paper bag. When you want to eat them for breakfast, take it out from the freezer before going to sleep (keep it always in a paper bag), then in the morning reheat it in the oven at about 150 °C, for just 3-4 minutes…they will be almost perfect every time 🙂


—————————————————————————————————————————————-
Products used:
Flours: organic Farina Manitoba and organic stone-ground Farina Buratto Tipo 2, from Mulino Marino

These look perfect and delicious! Love such pastries.
LikeLiked by 1 person
Thank you 🙂
LikeLiked by 1 person
I applaud your beautiful results because the effort that goes into making this is not for the shy or timid! So, I must ask, if a reader were to hop onto the next plane to Budapest, is there a bakery that you would highly recommend for finding these?
LikeLiked by 1 person
eheh 😀 thank you Rowena. In Budapest I suggest to try the csiga by “Artizàn Pékség” or by “Pékműhely”, for example 🙂
LikeLiked by 1 person
Che belli!!!
LikeLiked by 1 person
Grazie 🙂
LikeLiked by 1 person